


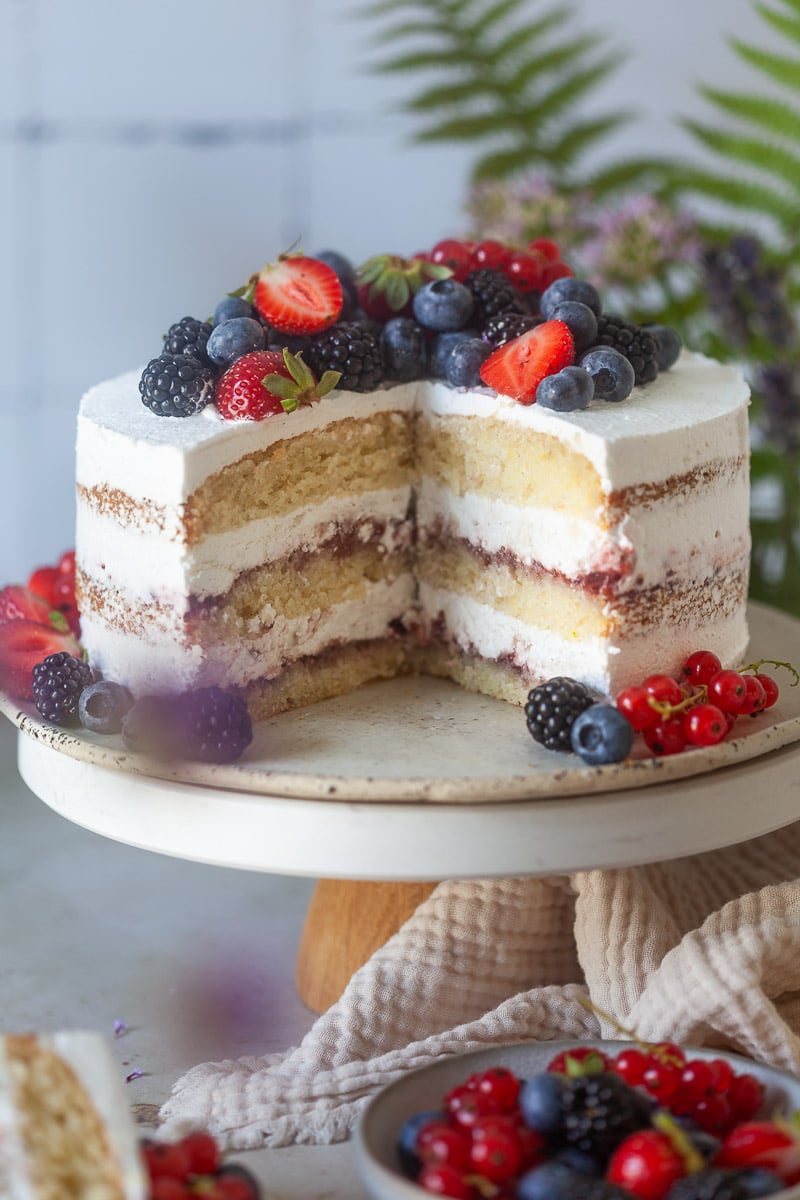
An easy Vegan Vanilla Berry Cake made with a soft vanilla sponge, creamy filling, and berry jam. A must-try vegan baking recipe for Summer!
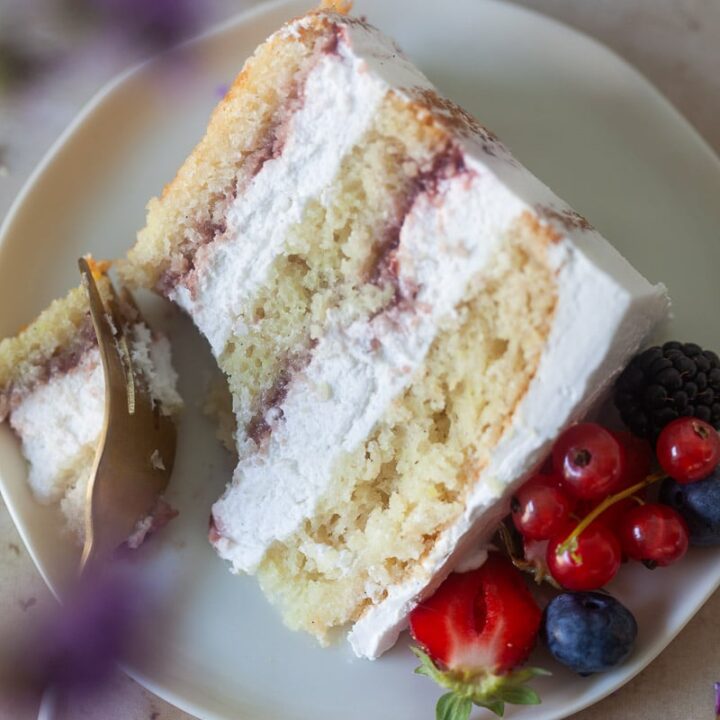
This Vegan Vanilla Berry Cake is about to become your new favorite. It’s everything we love in a cake: moist, fluffy vanilla sponge layers, a dreamy vegan cream filling, tangy berry jam, and a crown of juicy fresh berries. It’s simple, elegant, and 100% plant-based.
The sponge is fluffy thanks to sparkling water and a touch of vinegar (trust the process), and the cream layer sets beautifully with a little agar-agar. No complicated techniques needed. It’s the kind of cake that makes people say, “Wait… this is vegan?!”
Yes, it is! And even better?
You can make it ahead, let it chill in the fridge overnight, and it actually tastes better the next day.
It’s perfect for birthdays, summer parties, or just because you want a slice of something lovely in your fridge.
One of the best parts? This recipe proves that you don’t need dairy, eggs, or complicated techniques to make a show-stopping dessert.
Why you should save this recipe and make it asap?
Aside from the fact that it looks like it belongs in a bakery window, it’s surprisingly easy to put together, uses simple ingredients you can find in most supermarkets, and works for any celebration, from birthdays to “just because it’s Tuesday.”
The mix of vanilla, berries, and cream is timeless, and with a little agar-agar powder, the cake slices beautifully. Plus, it’s make-ahead friendly, which means you can prep it the day before and let the fridge do the work while you kick back.
Bottom line: if you love desserts that are gorgeous, delicious, and secretly low-effort, this one’s a keeper.
Grab your whisk, it’s cake o’clock!
Vegan Vanilla Berry Cake Ingredients
Before we dive into the full recipe of this Vegan Vanilla Berry Cake, let’s take a look at what you’ll need:
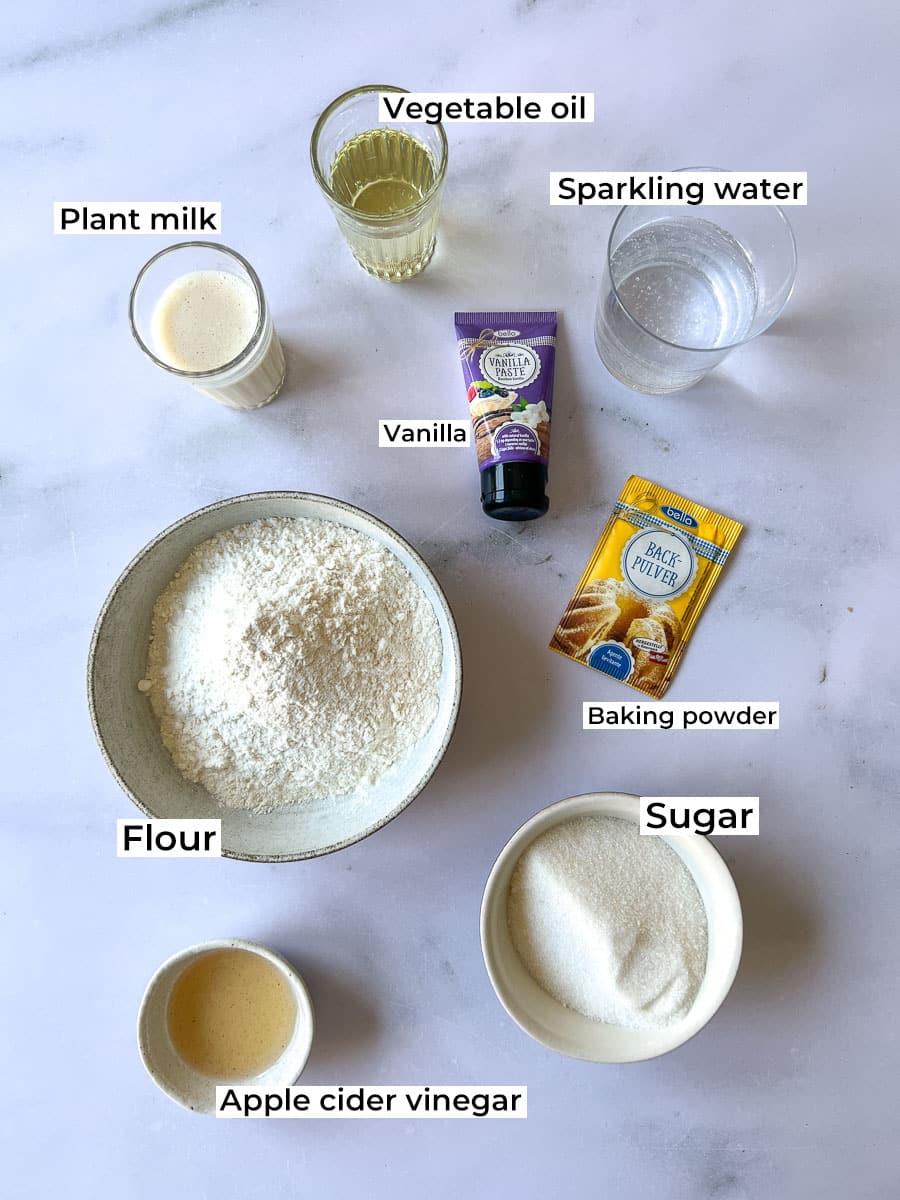
Vegan Vanilla Sponge
- All-purpose flour: The foundation of the sponge. This versatile flour provides the ideal texture: light yet structured enough to hold the cream and jam layers.
- Baking powder: This leavening agent helps the sponge rise evenly and creates a soft, airy crumb.
- Sugar: Regular white granulated sugar adds sweetness and structure. You can substitute it with brown or coconut sugar for a deeper flavor, though the sponge may turn darker in color.
- Vanilla extract: Adds that signature sweet, floral aroma that makes the cake feel like a classic vanilla dessert. Use real vanilla extract or vanilla paste for the best taste.
- Vegetable oil: Keeps the sponge moist without overpowering the flavor. Use a neutral oil like sunflower, canola, or grapeseed oil.
- Plant milk: Helps bind and hydrate the dry ingredients. Almond, soy, or oat milk all work well here.
- Sparkling water: Adds lift and fluffiness by introducing carbonation into the batter. This is a great vegan trick for extra light sponge layers.
- Apple cider vinegar: Reacts with the baking powder to boost rise and also helps tenderize the crumb. It won’t be noticeable in the final flavor. You can also use lemon juice.
Vegan Cream Layer
- Vegan mascarpone: The creamy base of the cake. Choose a brand that’s thick and not overly salty. You can also use vegan cream cheese. If using a tangier vegan cream cheese, you may want to increase the sugar slightly to balance flavors.
- Powdered sugar: Adds just the right touch of sweetness without graininess. Adjust to taste depending on the tartness of your mascarpone/cream cheese.
- Vanilla paste or extract: Enhances the overall cream flavor. Paste adds visible vanilla bean flecks for a more artisanal look.
- Agar-agar powder: A plant-based gelling agent that helps the cream layer set firmly while still remaining creamy. Be sure to fully activate it by boiling it with a small amount of liquid before incorporating. I have also seen a vegan “Gelatine Fix” in the stores that you can also use if you find it.
- Vegan whipping cream: Use a whippable vegan cream (such as Schlagfix, Alpro, or coconut-based ones). Whip to soft peaks and gently fold into the mascarpone mixture for a light, mousse-like consistency.
Feel like adding some flavor?
Replace some mascarpone with a lemon-flavored vegan yogurt (Alpro has a delicious “lemon cheesecake” flavor), and adjust with a little more agar-agar so the cake sets. Or simply add some lemon zest to the cream!
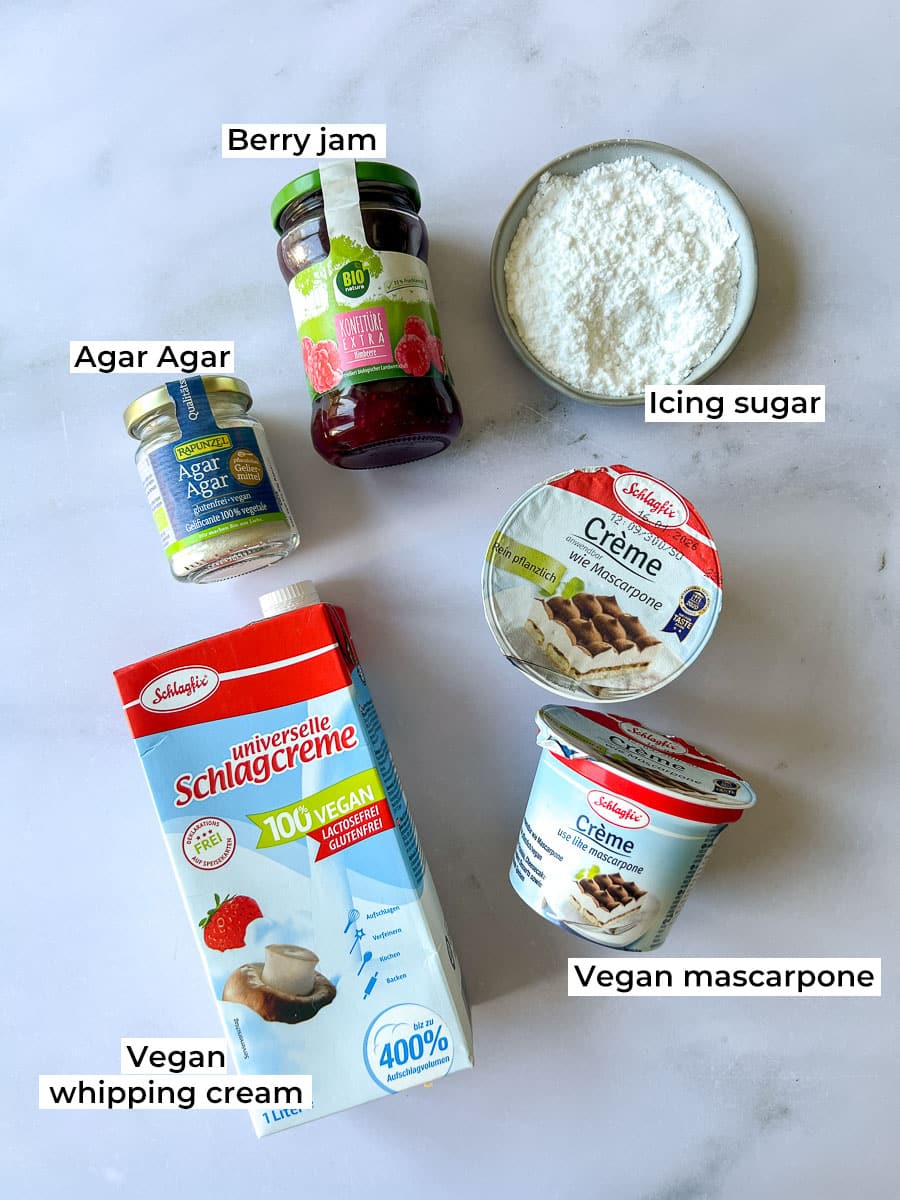
Other Ingredients
You will need these ingredients to assemble and decorate the cake:
- Raspberry jam or berry preserve: A vibrant, fruity layer that adds both color and sweet-tart flavor. Go for a high-fruit-content preserve or homemade jam for the best results.
- Plant milk: Used to soak the sponge layers for extra moisture and flavor. Optional but highly recommended for a softer texture, especially if the sponge is made ahead.
- Fresh berries for topping: Use a mix of raspberries, blueberries, strawberries, or blackberries for color and brightness. They also complement the jam layer beautifully.
- Vegan whipping cream: Whip and use as the final topping layer. Pipe or spread over the cake and top with berries for a beautiful finish. I used it sparingly to achieve a semi-naked cake style.
How to make Vegan Vanilla Berry Cake
This Vegan Vanilla Berry Cake is easier to make than it looks! With a soft, fluffy sponge, a fruity jam layer, and a rich yet light cream filling made without dairy or gelatin, it’s the kind of cake that impresses at first bite.
Below, I’ll walk you through each step and share some handy tips, especially for working with agar-agar, which is key for a stable, sliceable cream layer.
Preheat and prep the pan
Preheat your oven to 180°C / 350°F.
Line the bottom of a springform pan (18–20 cm / 7–8 inches) with parchment paper. You can lightly grease the sides, or line with parchment if you prefer easy release. I like to spray a little oil on the sides, then dust on top with granulated sugar, and it works every time!
Make the vanilla sponge
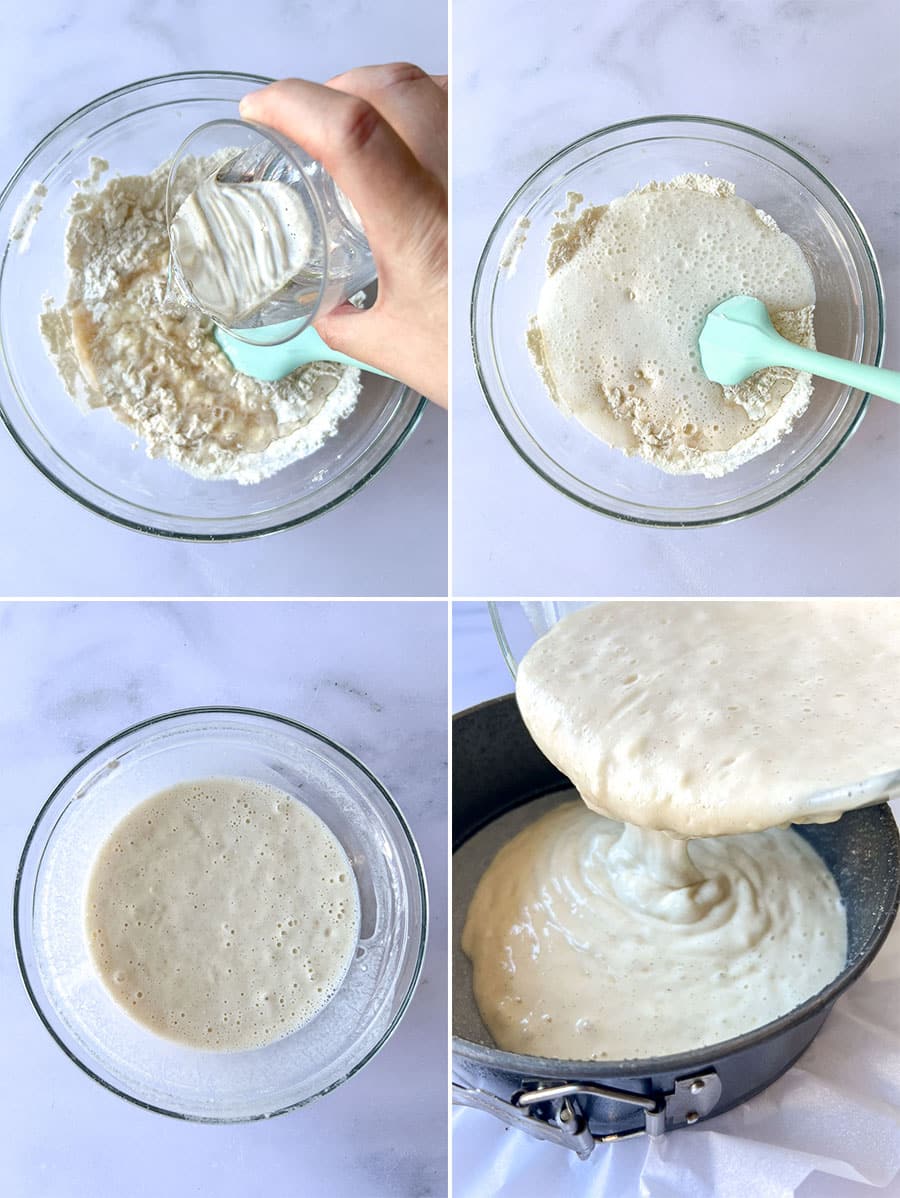
In a large mixing bowl, whisk together all-purpose flour, baking powder, sugar, and a pinch of salt.
In a separate bowl, combine the wet ingredients: neutral vegetable oil, plant milk (such as oat, soy, or almond), vanilla extract, and apple cider vinegar or lemon juice.
Whisk the wet ingredients well, then pour them into the bowl with the dry ingredients. Stir to combine.
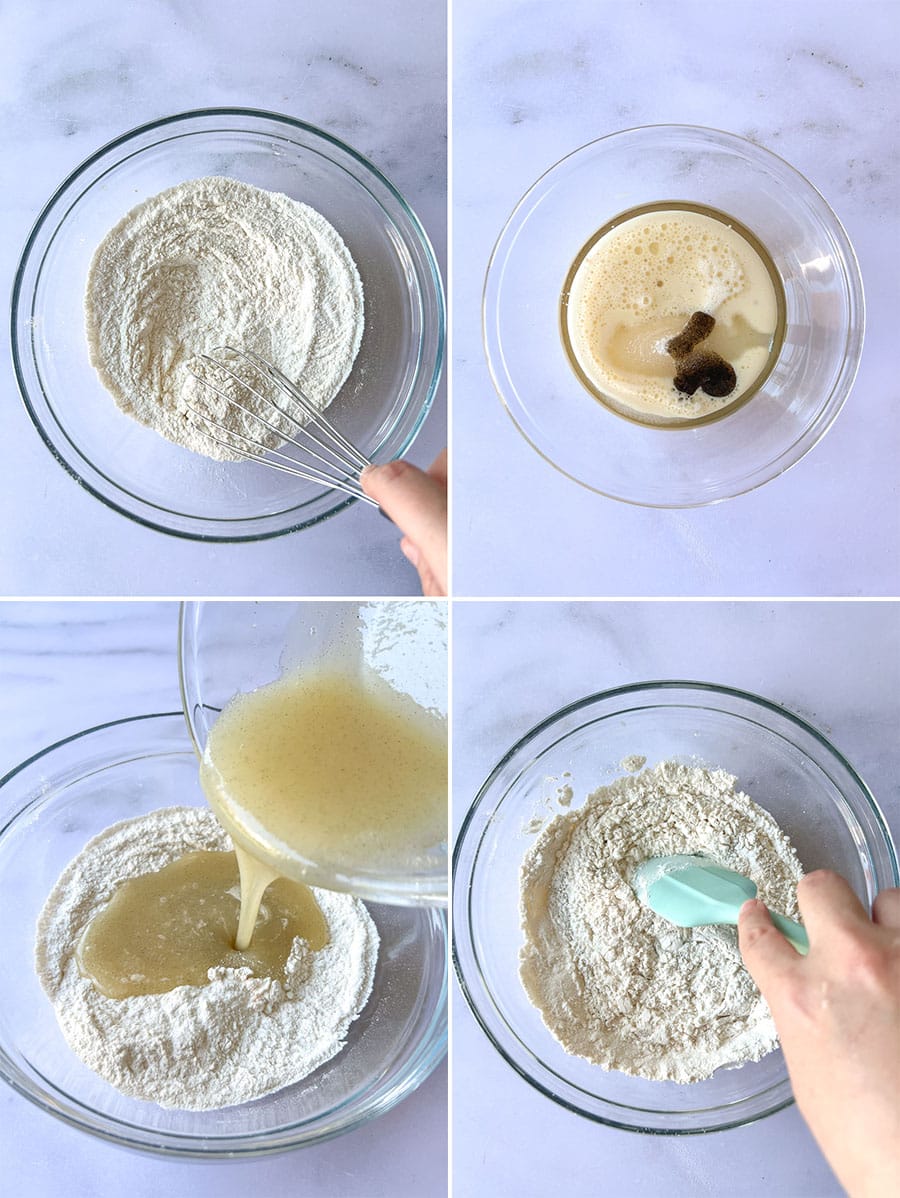
Lastly, add sparkling water to help create a light, airy batter.
Gently fold the mixture until just combined, but do not overmix!
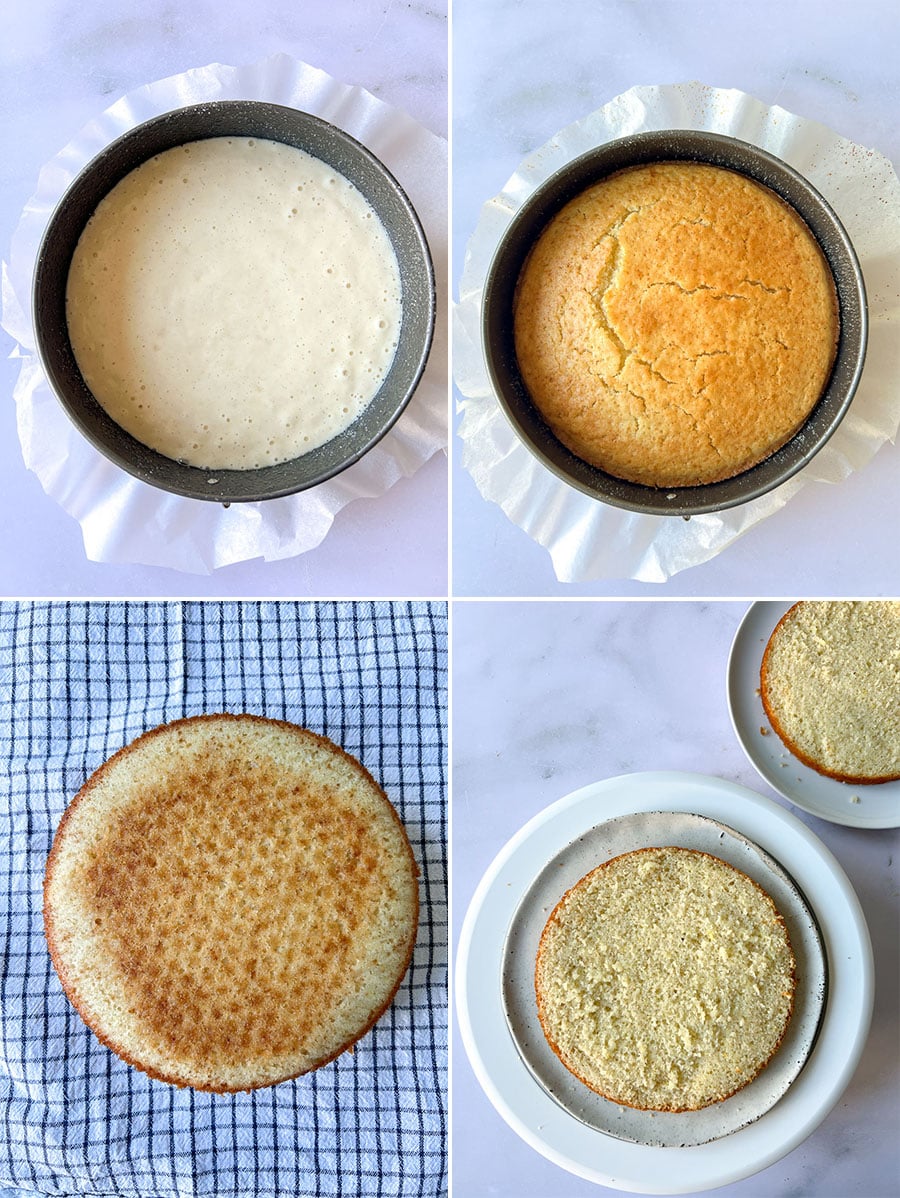
Pour the batter into the prepared pan and tap lightly to release air bubbles.
Bake the sponge
Place the pan into the preheated oven and bake for 30–40 minutes, or until a toothpick inserted into the center comes out clean. Check at 30 minutes to avoid overbaking.
Once baked, remove the sponge from the oven and let it cool completely on a wire rack.
Then carefully slice horizontally into 3 even layers using a serrated knife or cake leveler.
Make the vegan cream layer
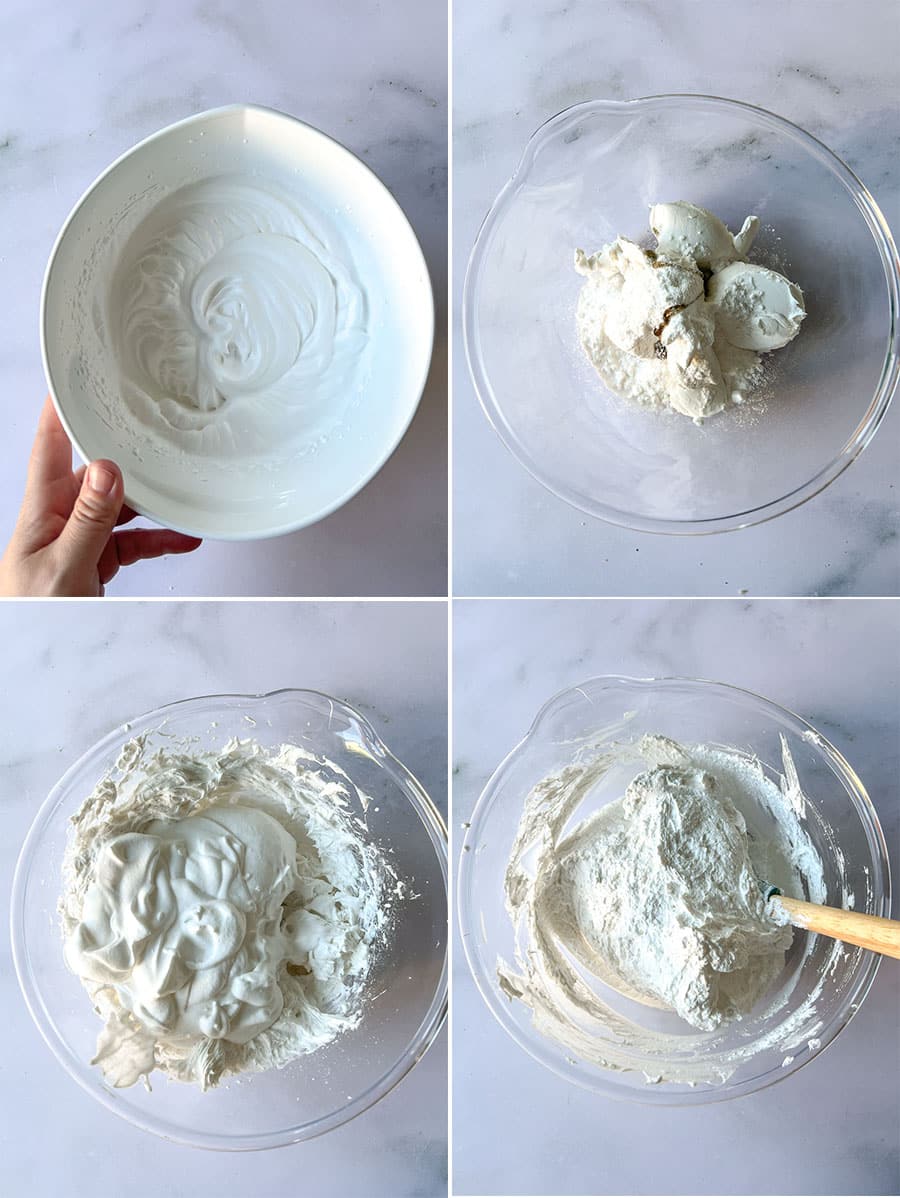
In a large bowl, mix vegan mascarpone or cream cheese, powdered sugar (you can adjust the amount to taste), and vanilla paste (or extract).
Whisk until smooth and creamy.
Whisk the vegan whipping cream until airy, but firm and set.
Set aside while you prepare the agar.
My tip: check the consistency of your cream before adding agar. I used a very thick vegan mascarpone, and the cream could withstand assembling even without adding agar, so I only used a tiny little bit.
How to use agar-agar
Agar-agar needs to be boiled to activate!
In a small saucepan, mix 2 grams of agar-agar powder with about 100 ml of the plant-based whipping cream (or milk). Whisk well to fully dissolve.
Bring to a gentle boil over medium heat, whisking constantly, and cook for 2–3 minutes. Important: If agar doesn’t boil, it won’t set properly!
Let it cool slightly (1–2 minutes) so it’s not piping hot, then immediately whisk it into your mascarpone mixture. Work fast, as agar sets quickly!
Now, fold in the remaining whipped vegan cream, making sure everything is light and fluffy.
Assemble the cake
Place your first sponge layer on a cake board or serving plate. Wrap with an adjustable cake ring and, optionally, with an acetate sheet for clean edges.
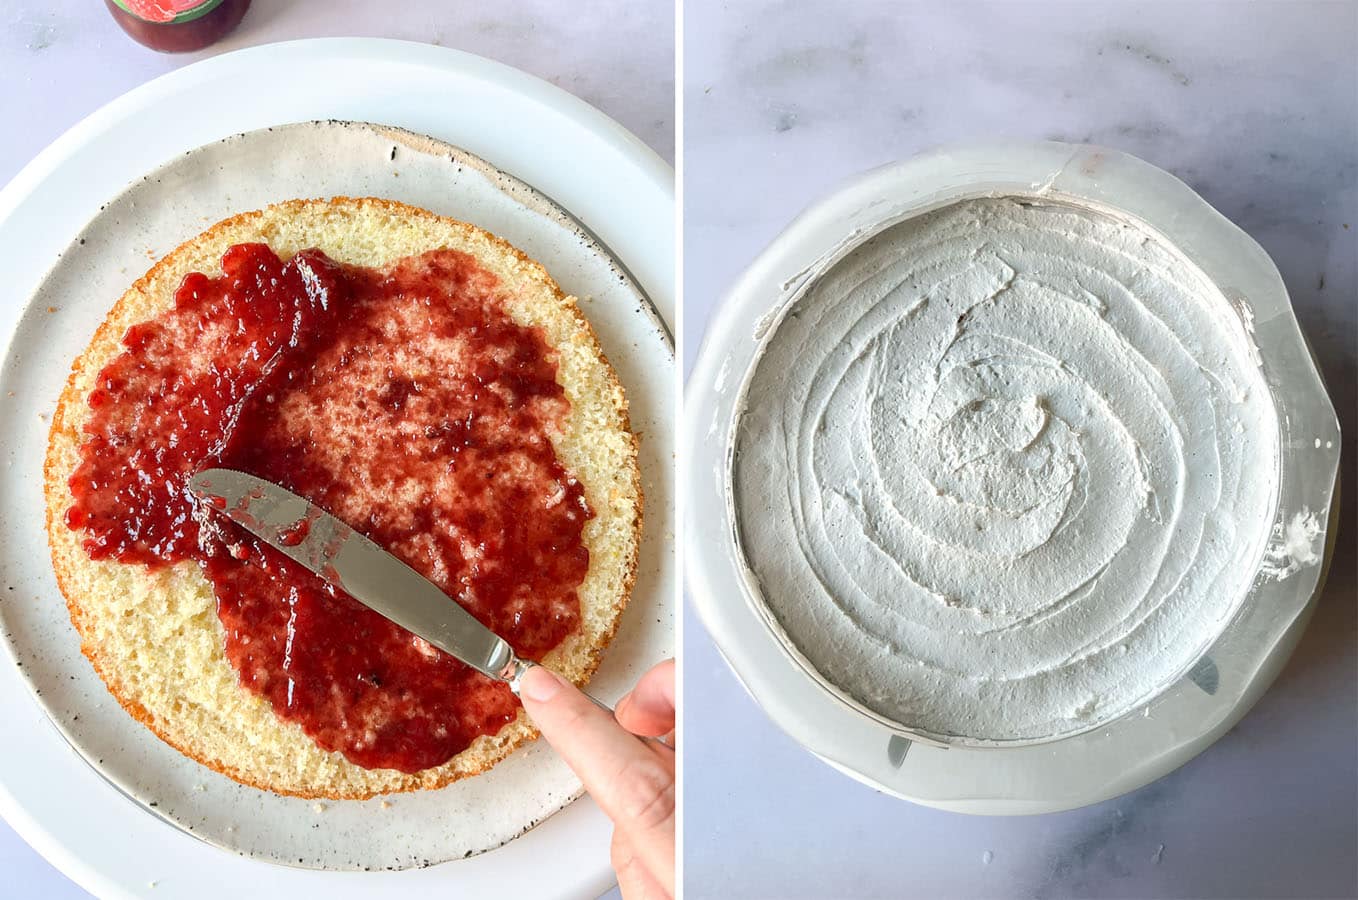
Soak the sponge with about 2–3 tbsp plant milk to keep it moist.
Spread half of the raspberry jam over the sponge. Add roughly half the cream filling and smooth it out evenly.
Repeat with the second layer:
- Soak with plant milk
- Spread jam
- Spread cream
Top with the final sponge layer, soak again lightly, and smooth a thin layer of cream over the top.
Chill time
Refrigerate the assembled cake for at least 2–3 hours, or ideally overnight, to let the cream firm up and the flavors meld together.
Finish and decorate
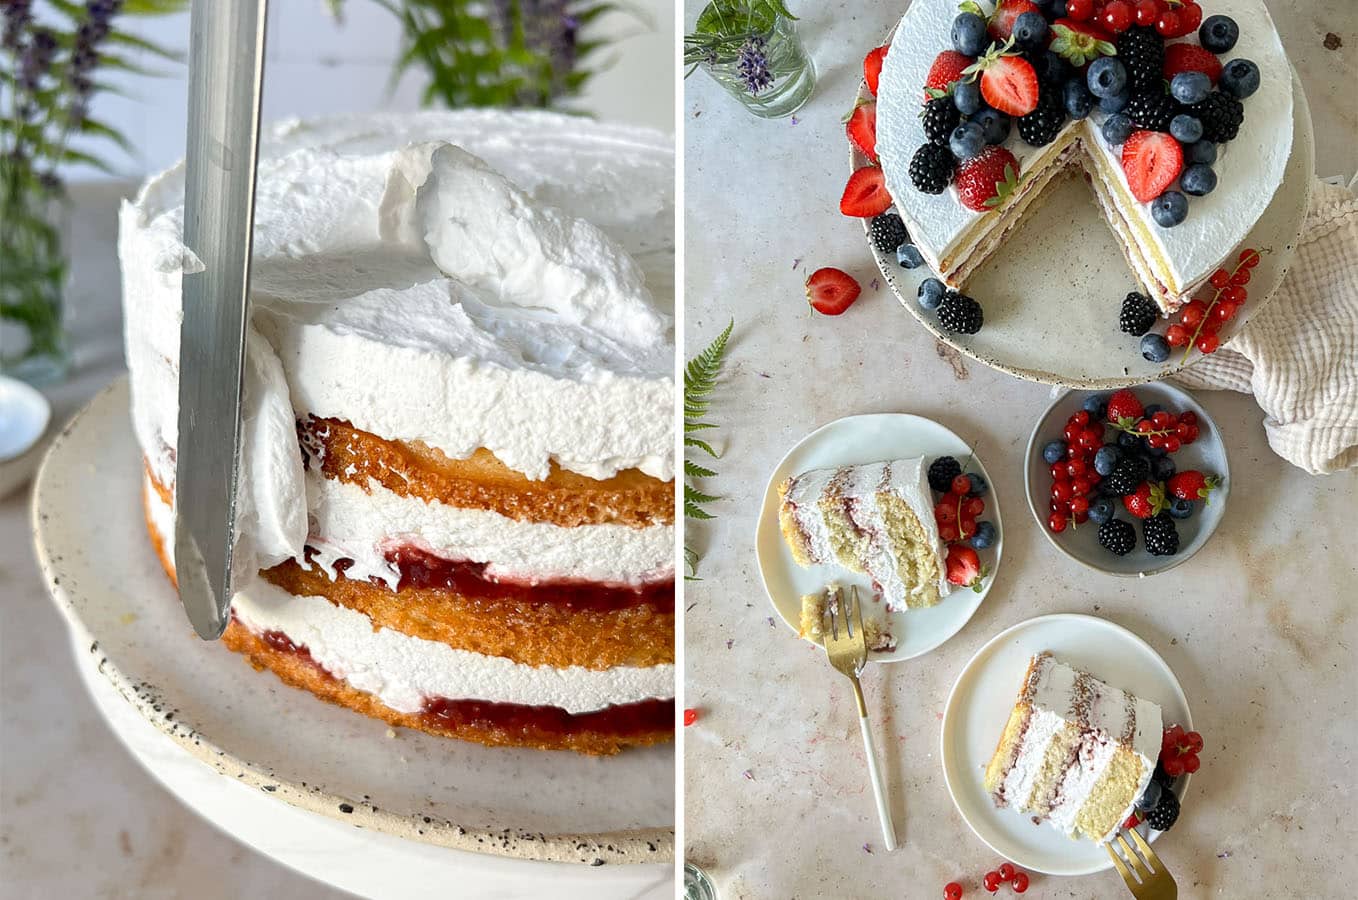
Once chilled, gently remove the cake ring and acetate foil.
Coat the outside of the cake with vegan whipped cream for a beautiful finish. You can skip this part and let the cake have a “naked” look, or apply a very thin amount of cream for a semi-naked look, as I did.
Top with fresh berries, shaved chocolate, or even edible flowers for a showstopper look!
Serving ideas
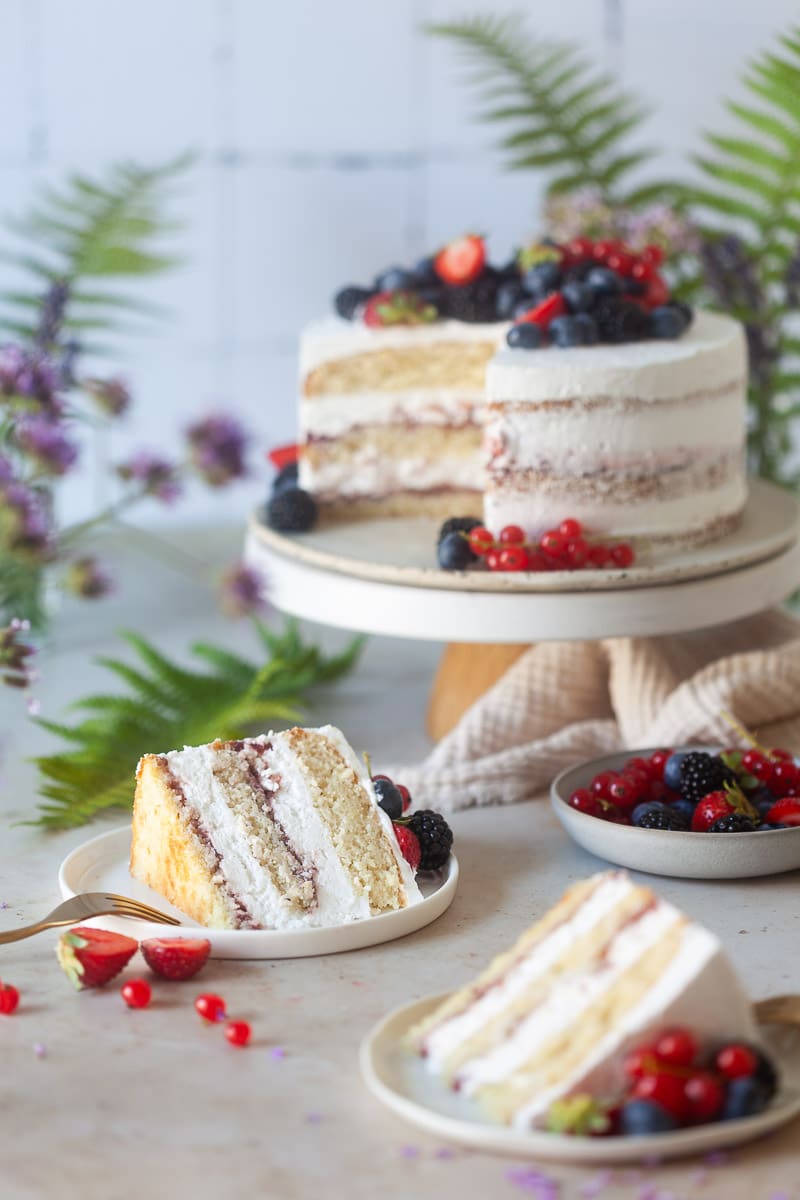
Serving your Vegan Vanilla Berry Cake the right way makes all the difference! Here’s how to get the most flavor and the best texture from every slice:
- Take it out of the fridge 10–15 minutes before serving. This is crucial as it allows the cream layer to soften slightly, giving it a smooth, mousse-like texture that’s easier to slice and more enjoyable to eat.
- Use a sharp knife and wipe it clean between slices to keep those layers neat and picture-perfect.
- For a clean presentation, serve it on a cake stand or a chilled plate to keep the cream from melting too quickly, especially on warm days.
- Top with extra fresh berries and a dusting of powdered sugar right before serving for a pop of color and freshness.

Storage tips
If you want to save any leftovers, here are the best storage tips to keep your cake tasting as good as day one, plus how to freeze it like a pro.
Refrigeration:
- Once assembled, keep the cake covered in the fridge in an airtight container or cake dome. It will stay fresh for up to 3–4 days.
- For the best texture, remove from the fridge 10–15 minutes before serving to allow the cream to soften slightly.
- If the cake is already sliced, place a small piece of parchment or wax paper between slices to prevent sticking.
Freezing:
- Cut the cake into portions. Wrap each slice in plastic wrap and place it in a freezer bag or container. Freeze for up to 1 month.
- You can also freeze the whole cake! Remove the cake ring and wrap the entire cake tightly in plastic wrap, then again in foil, or place it in a large freezer-safe container.
- Thaw in the refrigerator overnight or for at least 6–8 hours.
- Let it sit at room temperature for 10–15 minutes before serving for the best texture.
Note: Fresh berries on top may soften after freezing. For the best presentation, decorate with berries after thawing.
Similar recipes:
Vegan Vanilla Berry Cake
An easy Vegan Vanilla Berry Cake made with a soft vanilla sponge, creamy filling, and berry jam. A must-try vegan baking recipe for Summer! This recipe is suitable for a baking tin of 18-20 cm / 7–8 inches in diameter.
Ingredients
Vegan Vanilla Sponge
- 210 grams all-purpose flour
- 11 grams baking powder
- 140 grams sugar
- 1 tsp vanilla extract
- 70 millilitre neutral vegetable oil
- 70 millilitre plant milk
- 160 millilitre sparkling water
- 1/2 tbsp apple cider vinegar or lemon juice
Vegan Cream Layer
- 500 grams vegan mascarpone or vegan cream cheese
- 2–3 tbsp powdered sugar
- 2 tsp vanilla paste or extract
- 2 grams agar-agar powder or 1 packet of vegan "Gelatine Fix" (Dr. Oetker has a vegan version in some countries)
- 250 millilitre vegan whipping cream (such as Schlagfix, Alpro, or coconut cream)
Other Ingredients
- 370 grams raspberry jam or berry preserve
- 200 millilitre plant milk
- Fresh berries for topping
- 200 millilitre vegan whipping cream
Instructions
- Preheat oven to 180°C. Line the bottom of an 18–20 cm / 7–8 inches springform pan with baking paper.
- For the sponge: In a bowl, mix flour, baking powder, sugar, and vanilla sugar. In a separate bowl, whisk together plant milk, oil, vanilla extract, and vinegar. Pour wet into dry, add sparkling water, and gently mix until just combined.
- Pour into the greased pan (or lined with parchment paper) and bake for 30–40 minutes or until a toothpick comes out clean.
- Cool completely and cut into 3 even layers.
- Make the vegan cream: In a bowl, mix vegan mascarpone (or vegan cream cheese), sugar, and vanilla.
- Prepare the agar-agar: In a small saucepan, mix the agar-agar powder with about 100 ml of the plant-based whipping cream (or milk) before heating. Whisk well to dissolve. Bring the mixture to a gentle boil for 2–3 minutes, stirring constantly. Agar must boil to activate fully. Remove from heat, let cool for 1–2 minutes, then immediately mix it into your mascarpone mixture while whisking or blending to avoid clumping.
- Fold in the remaining whipped cream (if whipping separately).
- Assemble the cake: Place the first sponge on a cake board and wrap with a cake ring + acetate sheet. Soak generously with plant milk. Spread half the jam and half the cream.
- Repeat with the second sponge layer, more milk, jam, and cream.
- Top with the final sponge, soak it as well, and spread a thin layer of cream on top.
- Chill in the fridge for at least 2-3 hours or overnight.
- Finish & decorate: Remove the cake ring and acetate. Coat the cake with the remaining whipped vegan cream. Decorate with fresh berries and enjoy!
- Serving: I recommend removing the cake from the fridge at least 10 minutes before serving, so the cream softens a little!
Notes
For a tasty cream variation:
- Replace a few tbsp of mascarpone with vegan yogurt and grate in lemon zest. Choose a neutral plant-based yogurt or a lemon cheesecake-flavored one! Don't forget to adjust the agar agar amount as yogurt is more liquid than mascarpone!
- Swirl more jam directly into the cream!
How to use agar-agar for use in cakes:
- Always check your package instructions — strength can vary by brand. If using a thick cream like cream cheese or mascarpone, you only need a small amount for the cream to set!
- Mix agar powder with liquid (cold or room temp): Whisk the agar powder into your liquid before heating to avoid clumps.
- Bring to a boil: Heat the mixture over medium heat, stirring constantly. Once it starts boiling, keep it at a gentle boil for 2–3 minutes to fully activate the agar.
- Use immediately: Agar sets quickly as it cools (in about 15–20 minutes at room temp), so pour or layer it into your cake molds right away.